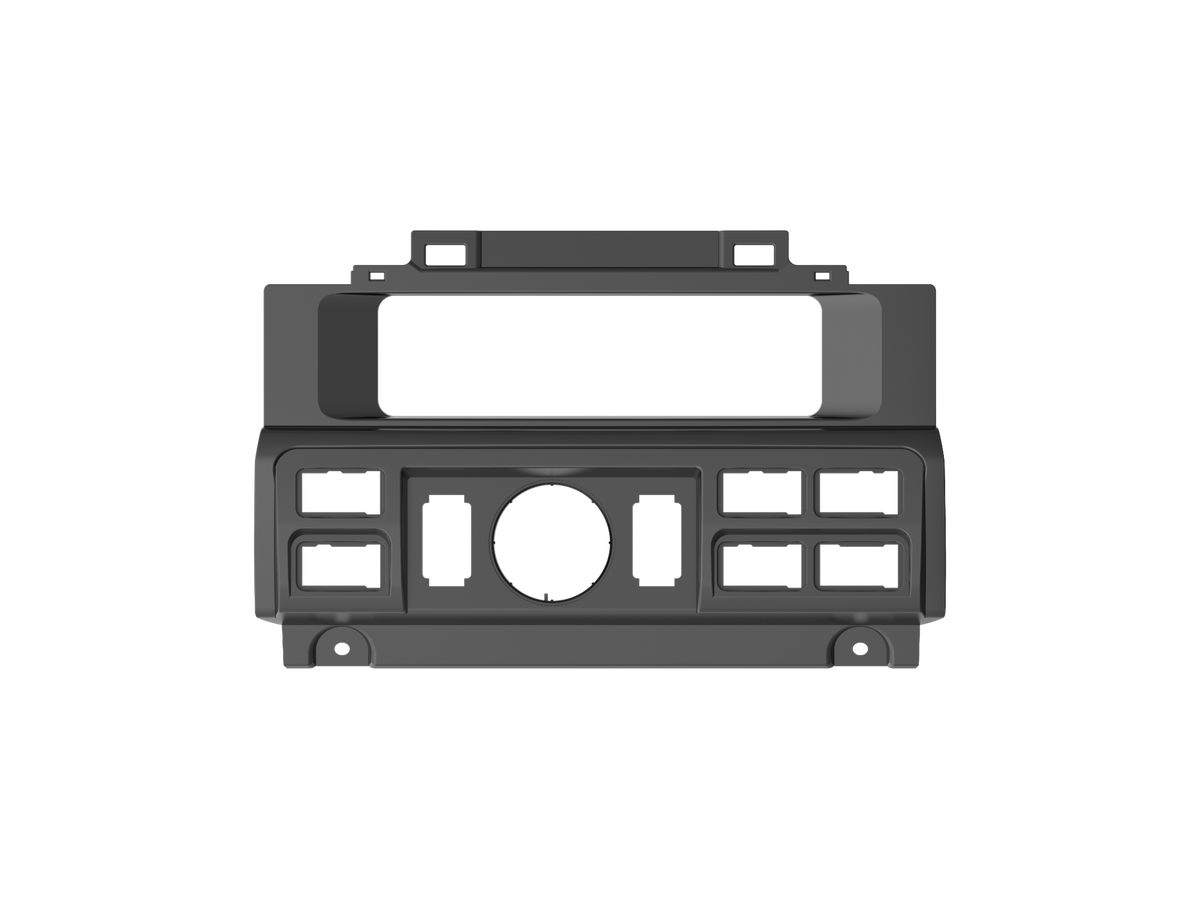
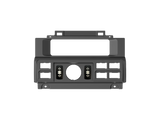
Airbag Gauge Switch Panel Lower dash panel for 70 Series LandCruiser
A precision injection-moulded ABS panel that replaces the factory lower HVAC trim on your 70 Series LandCruiser, giving you a clean, OEM-style home for airbag paddles, pressure gauges, switches, USB ports and more.
or 4 interest-free payments of $32.25 with Shop Pay & Afterpay
Item code: LC70-SWITCHPANEL-GAUGE
Why your dash deserves better.
The factory lower HVAC trim on the 70 Series was never designed to handle airbag suspension controls, auxiliary switches or pressure gauges. Bolting components onto bare metal or zip-tying them under the dash is a compromise that looks it. This panel replaces that trim with a purpose-built piece that sits flush and looks like it came from the factory.
Manufactured from injection-moulded ABS plastic rather than 3D-printed material, the finish is consistent, UV stable and built to handle the heat cycles and vibration of regular off-road use. The layout is optimised for Airbag Man suspension components, though the open mounting positions suit switches, USB ports, blanks and gauges from a wide range of brands.
Switches, blanks, gauges and paddles are sold separately, so you only pay for what your build actually needs.
Built for the job.
INJECTION-MOULDED ABS
Manufactured using a production injection-mould tool, not a desktop 3D printer. The result is consistent wall thickness, a smooth surface finish and long-term UV and heat resistance inside the cabin.
OEM REPLACEMENT FIT
Designed to slot directly into the space vacated by the factory lower HVAC trim panel. No cutting, no modification to the dash structure and no visible gaps once installed.
AIRBAG-READY LAYOUT
Cutout positions are optimised for airbag suspension paddles and pressure gauges, including Airbag Man system components, while remaining versatile enough for custom 12V switch layouts.
Vehicle fitment.
Installation overview.
REMOVE FACTORY TRIM
Use a 10mm socket to remove any retaining fasteners, then use a flathead screwdriver to carefully release the clips holding the OEM lower HVAC trim panel in place. Set the factory panel aside.
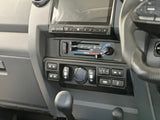
SEAT THE PVS PANEL
Align the new switch panel with the factory mounting points and press firmly until all clips engage. The panel should sit flush with the surrounding dash trim with no visible gaps.
FIT YOUR COMPONENTS
Install your airbag paddles, pressure gauges, switches or blanks into the panel cutouts. Route and connect wiring as required for your specific components. Any optional modifications to suit non-standard accessories can be made at this stage.
What owners Say.
"Easy to install and looks fair dinkum too, wish I bought it 12 months ago"
"Well made and easy to fit and looks excellent."